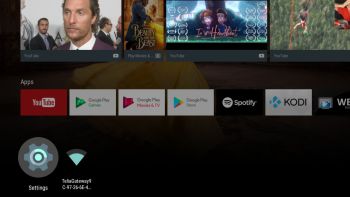
 NEWS 171019 about RaspAnd Nougat 7.1.2 for Raspberry Pi 3
RaspAnd Nougat 7.1.2 Build 170805 can be installed in Windows using Win32 Disk Imager. This method has one disadvantage. Only about about 5GB can be used as data storage no matter which card you use. I have therefore today uploaded a new version, which can be (must be) installed using a Linux system. The new system from 171019 is basically the same system as the RaspAnd system from 170805. I have only added AIDA 1.47 and replaced Google Chrome with Firefox 56.0. Kodi has been upgraded from version 17.3 to version 18.0-ALPHA1. Now say, for example, that you use Micro SD card (preferable a class 10 card) of 64GB about 56GB can be used as data storage. This is of course a big advantage. NEWS 171102: Yesterday a member on this site wrote about how to get rid of the 5GB limit after Win32 Disk Imager has been used:
– write the image with Win32 Disk Imager
– start up Ubuntu or another Linux system – you can also use a Linux Live CD/USB stick
– start GParted – screenshot before resizing
– resize the DATA partition – screenshot after resizing
– done!
How do I install RaspAnd 7.1.2 Nougat version 171019?
Almost like any other Raspberry Pi system. As I say above the installation has to take place in Linux though. (From hard drive or while running a live Linux system from a CD or a USB stick). Follow my instruction below. The whole thing has to be done as root and exactly like this.
1. Unpack the downloaded zip-file (raspand-nougat-7.1.2-gapps-aptoide-tv-kodi-linux-install-599mb-171019.zip). You will get the folder raspand-nougat-7.1.2-gapps-aptoide-tv-kodi-linux-install-171019 with the folder boot and the system file system.img
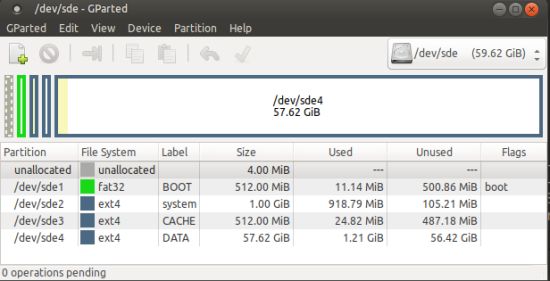
2. Create four partitions of/on your Micro SD Card with Fdisk or GParted.
a) Part 1 for BOOT of 512 MB ; format as fat32 ; flag as boot
b) Part 2 for /system of 1024 MB; any filesystem
c) Part 3 for /cache of 512 MB ; format as ext4
d) Part 4 for /data; size the remain; format as ext4
When you are done with partitioning it shall look like the screenshot below shows. The needed partitions for RaspAnd are created with GParted in Linux.

3. Now open up a terminal as root and run the command below. Make sure which name your SD card was given when you inserted it. I.e. /dev/sdb2 or /dev/sdc2 or as in the example here /dev/sdd2. Unmount /dev/sde2 first with umount /dev/sde2. Then:
dd if=system.img of=/dev/sde2 bs=1M
(Note: When you run the above command you’ll have to stand in the folder raspand-nougat-7.1.2-gapps-aptoide-tv-kodi-linux-install-171019).
4. Then just copy every file in raspand-nougat-7.1.2-gapps-aptoide-tv-kodi-linux-install-171019/boot (11 files) to /dev/sde1. If not mounted already you can mount it with mkdir /mnt/sde1 followed by mount /dev/sde1 /mnt/sdd1
Note: You shall not do anything with /dev/sde3 and /dev/sde4. I. e.: Do not create folder /cache or /data. Watch this screenshot of the file structure on all four partitions when the installation is done.
This RaspAnd build has been replaced by Build 171215
READ MORE about RaspAnd 7.1.2 Nougat version 171215…
Android is a trademark of Google Inc.
Raspberry Pi is a trademark of Raspberry Pi Foundation


Hi
I have the 4 partitions created but i don’t know what i must do with the boot folder and the system.img file.
Help please
Please read my INFO at https://raspex.exton.se/?p=733 under How do I install RaspAnd 7.1.2 Nougat version 171019?
Just do as I say and it’ll work!
These instructions end with a description of the partitions to create and a GPARTED screen dump of the result. They do NOT tell us what to do with the unpacked distribution; i.e. how to get it on the partitioned SD card.
Would I be right in assuming that the contents of the boot folder simply need to be copied to the /boot partition on the SD card, while the system.img file needs to be written to the /system partition on the SD card using dd?
How does a boot loader get written to the SD card?
Yes, you are right. I forgot that. Please read the full instruction at https://raspex.exton.se/?p=733
Sorry.
This IS that link, and you’re missing any information about actually copying the files.
I expect you just need to copy the contents of the /boot folder to the /boot partition, and system.img to the /system partition. But you _do_ need to mention these things…
Ah. I think I see his problem. In my browser (Chrome on Windows), until I commented I didn’t see the file copy instructions–they were overlaid with an ad!
could you explain section 3 in detail, I do not understand that part. I have unzipped the downloaded file, I have created the 4 partitions with gparted and copied the boot files in the boot partition. I have a live linux from a cd on another computer, how can I be root and transfer the file in the system partition ?
thanks for your help
su to become root.
dd if=system.img of=/dev/sdX2 bs=1M
NOTE: Change X to b, c, d or… (Check it carefully before your run the command to avoid data losses).
I did everything as you say as root with sudo -i, it says records in records out in les than 1 minute but nothing appears in the system partition
I said su not sudo. You should also unmount /dev/sdX before you run the command. I.e. umount /dev/sdX
yes but su asks for a password which I do nat have
Hi!
I’ve been using version 170805 for some time now and works like a charm. Two questions come to mind though:
1- How can I download future versions/updates having purchased a previous one?
2- Are there any plans on providing HDMI-CEC support in order to use the TV{s remote control to navigate?
Thank you!
Ezequiel,
Thanks for your report.
1- Just tell me you want the new version. Every new version within every branch (Marshmallow, Nougat, Oreo etc) is free. You will be notified by PayLoadz.com when a new version is ready.
2- Hopefully soon.
Pingback: RaspAnd Nougat 7.1.2 para Raspberry Pi 3 ahora trae Kodi 18 de serie
Pingback: RaspAnd donosi Android 7.1.2 Nougat na Vas Raspberry Pi 3 i jos mnogo korisnih alata | Programiranje
Hi , Im using the version 171019 but the Play Store “is not compatible”. Can you help me?
Please read my INFO at https://raspex.exton.se/?p=691
Especially under Gmail and Google Play Store
Hello
To get rid of the limit of 5GB easily, this is the method I used :
– write image with Win32 Disk Imager
– use Ubuntu
– start GParted
– extend the DATA partition
– Done !
Christophe.
Very good. Thanks for sharing! I will write about it on the INFO site.
Pingback: Émission #142 du 2 novembre 2017 – La housse en poil – blogueLinux.ca
Hello,
i’m very very interested by your raspand and your raspex version.
I would like to known if it’s possible to install these two version with a multiboot program.
And if yes, could you describe me the process.
Thank’s for all theses works, it’s very great.
JP
JPierre,
I don’t think multiboot is possible. You just have to use two (separate) cards.
1.Can i use office 7 inch touch screen at this os?
2.Can i sell my devices with this OS to other?
1. It should be possible, but I don’t know how to configure it.
2. I guess you can do that.
Thank you, i will buy it .
Hi,
how to be root on RasPand ?
I need to instal a start up manager,
I have some trouble with memory consumption.
Some trouble too with app setting and keyboard setting.
and impossible to shutdown raspand without unplug power supply.
You can’t be root. Sorry.
Hi exton, after following the instructions carefully. I boot the raspberry, I see some colours at the very begining of the boot process, after that I get blanc screen “Out of Range”. I tried different setups on the config.txt file with no luck. My TV is 32″ , is there a setup in order to make it work? Please help
Have you tried to run RaspAnd using another monitor?
Hi
Are there any plans to support Bluetooth on this version?
In upcoming versions perhaps…
How to wire connect to network with ethernet adapter ? There isn’t ethernet element in menu “Wifi and network”.
Just connect the wire to your Rpi. You will be connected to Internet immediately.
Hi, I have the official pi 7″ touchscreen and I can only see a part of the ui.
What do I need to do to get this to work with the pi 7″? Running on a rpi3mb
Thanks!
Try with this config.txt
hdmi_force_hotplug=1
hdmi_drive=2
config_hdmi_boost=4
hdmi_group=1
hdmi_mode=4
disable_overscan=1
framebuffer_width=1280
framebuffer_height=720
kernel=zImage
device_tree=bcm2710-rpi-3-b.dtb
dtparam=audio=on
#dtoverlay=vc4-fkms-v3d,cma-256
dtoverlay=vc4-kms-v3d,cma-256
dtoverlay=i2c-rtc,ds3231
dtoverlay=rpi-backlight
dtoverlay=rpi-ft5406
initramfs ramdisk.img 0x01f00000
mask_gpu_interrupt0=0x400
avoid_warnings=2
enable_uart=1
Hello. I will need connect to Raspand through a VNC client…
Then, can I install a VNC server with sound support in Raspand?
Regards
Pingback: Programiranje | RaspAnd donosi Android 7.1.2 Nougat na Vas Raspberry Pi 3 i jos mnogo korisnih alata
hello,
Why does not the system load me on my raspberry pi 3 b +?
I don’t know that yet. I’m looking into the matter. Hope to be back with a solution soon.
They can support hyperpixel screen and Adafruit Tft for Raspand. Thus to be able to create portable androidTv. Thanks
But i can use etcher for put image, and i must resize partition data?
Etcher yes. You don’t HAVE TO resize anything but you can if you want.
i can execute power off